How Can You See What Ports are Available on Your Perimeter?
One of the things we often see during an external penetration test is unnecessary services exposed to the Internet. This will increase the attack surface of your organization, ultimately giving hackers more ways to try to break into your organization. One of the main principles to follow when setting up your perimeter firewall is to only allow traffic that is absolutely necessary through, and explicitly deny all other traffic. This is easier said than done, however, and will lead you on a quest to figure out exactly what services need to be available from the Internet and why. While this will ultimately give you a better understanding of your perimeter (really important) so you can reduce that attack surface, it can be time consuming. So once you take action and lock down your firewall, how can you see what ports are available on your perimeter?
Being able to see what ports are available on your perimeter will help you to verify any changes you make to the firewall and help you ensure your attack surface stays as limited as possible. Although there are several solutions available to accomplish this, nmap is one of the most widely-recognized (and free) port scanners out there. For this tutorial, we will be using Zenmap, which is a GUI version of nmap that is available for Windows, making it slightly more user-friendly than the command-line interface of nmap.
Using Zenmap to See What Ports are Available on Your Perimeter
Step 1: Download and Install Zenmap
The first step is to download and install Zenmap on your system. This should be installed on a system outside of your corporate network (or a laptop which you can be moved outside of your corporate network) in order to scan the perimeter from the Internet.
Zenmap can be downloaded here.
The entire installation process takes about 5 minutes, and you can really just accept the defaults on each screen, making it relatively painless.
Step 2: Open Zenmap and Configure a Scan

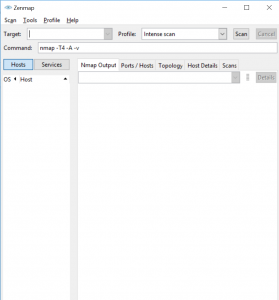
Once you open Zenmap, you should see a screen that looks similar to the one on the right. Let me walk you through the various fields and how to set up your scan.
Target: This is where you would put the IP addresses for the scan. In order to scan your perimeter, you would input the entire range allocated to your organization. If you want to make the scan go faster, you can scan only the systems you know have listening ports. Keep in mind, it is important to periodically scan the entire range so you can identify any unexpected hosts.
Profile: Zenmap has some pre-configured profiles (Intense Scan, Quick Scan, etc.) these certainly have a time and place, however, for our purposes we want a customized scan, so we’ll ignore these.
Command: The command is where we can enter a custom nmap command, just like we would with the command-line version. This is where nmap is truly powerful, because there are hundreds of flags that can be used to change the configuration of the port scan, all of which can have an impact on the results.
For scanning your perimeter to see what ports are available, I would recommend the following flags in the “command” field:
nmap -p- -v -A -T4 -Pn
Lets go through all of those options:
-p- : Scan all 65,535 TCP ports of the specified targets. Although this will take awhile, it is the only way to ensure you are identifying all open ports.
-v: This is telling nmap to be verbose. Using this option will display more useful information and more status updates while scanning.
-A: Enable OS detection, version detection, script scanning, and traceroute. This means that after the port is found to be open, nmap will take additional steps to find out more about the service running on that port and the underlying host.
-T4: This flag impacts the speed of the scan. T4 is reasonably aggressive and should work fine for most scans where you’re not trying to be evasive or quiet in any way.
-Pn: By default nmap will try to determine if a host is alive via a ping before running a scan. This makes it much quicker, especially when scanning a large range of hosts. However, this is not always the most accurate. Nmap will send a ping and a TCP Probe to port 80 to determine if a host is listening, which can miss a lot of hosts. The -Pn option tells nmap to treat every system as up and complete a full scan of all targets.
Step 3: Launch the Scan
Now that we’ve set our target and specified the command flags we want to run, you can click the “Scan” button to kick it off.
Step 4: Interpret the Results
Once the scan completes, it is time to interpret the results. The easiest way in Zenmap is to click on the “Ports/Hosts” tab rather than trying to read through the details on the “Nmap Output” tab. In order to understand the results, we have to dive a little bit into how nmap works, so bear with me.
First, and many of you probably know this, but when your computer tries to connect to a TCP port over the Internet, it does a 3-way handshake to establish the connection. This consists of
- Your machine sending a SYN packet saying “Hey, I would like to connect.”
- The server responds with a SYN, ACK packet saying “OK great, lets connect.”
- You send back an ACK packet, establishing the connection.
In the scan we did above, known as a SYN scan, your computer sends the SYN and then determines whether the port is open by the response. There are really three options for each port:
- The port responds with SYN, ACK, indicating that the port is up and accepting new connections. In this case, the port is marked as open.
- The port responds back with a RST packet. This indicates that you made it to the port, but there is no service listening on that port to accept the connection. In this case, the port is marked as closed.
- The port never responds in the designated time window. This typically indicates that there is something blocking the connection and filtering packets sent to the port (i.e. a firewall). In this case, the port is marked as filtered, and it will not even show up in the results.

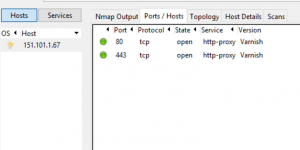
In the screenshot above, the scan found port 80 and 443 as open, with the remainder of the ports filtered. So when you interpret the results of the scan, you want to look for all the open ports and determine if they are expected/necessary. Some ports need to be exposed so people can reach them from the Internet, such as your company’s marketing website. Other ports may need to be available, but only to certain hosts. For example, if you need an SFTP server to be available for one of your clients, you can lock that down in your firewall to only allow their IP address to see it, in which case it should still show up as filtered in your port scan.
The other thing you want to look for is to make sure there are no closed ports showing. Again, closed ports indicate that the scan reached the target server, however, there was no service listening. This is an indication that there is a hole in your firewall allowing unnecessary traffic through, since there is no service expecting the traffic. This could be a result of architecture changes or overly permissive rules. Either way, these holes in your firewall can be closed.

